Followers

Thursday 15 December 2016

Kit and Clowder November 2016 class

Hi there,

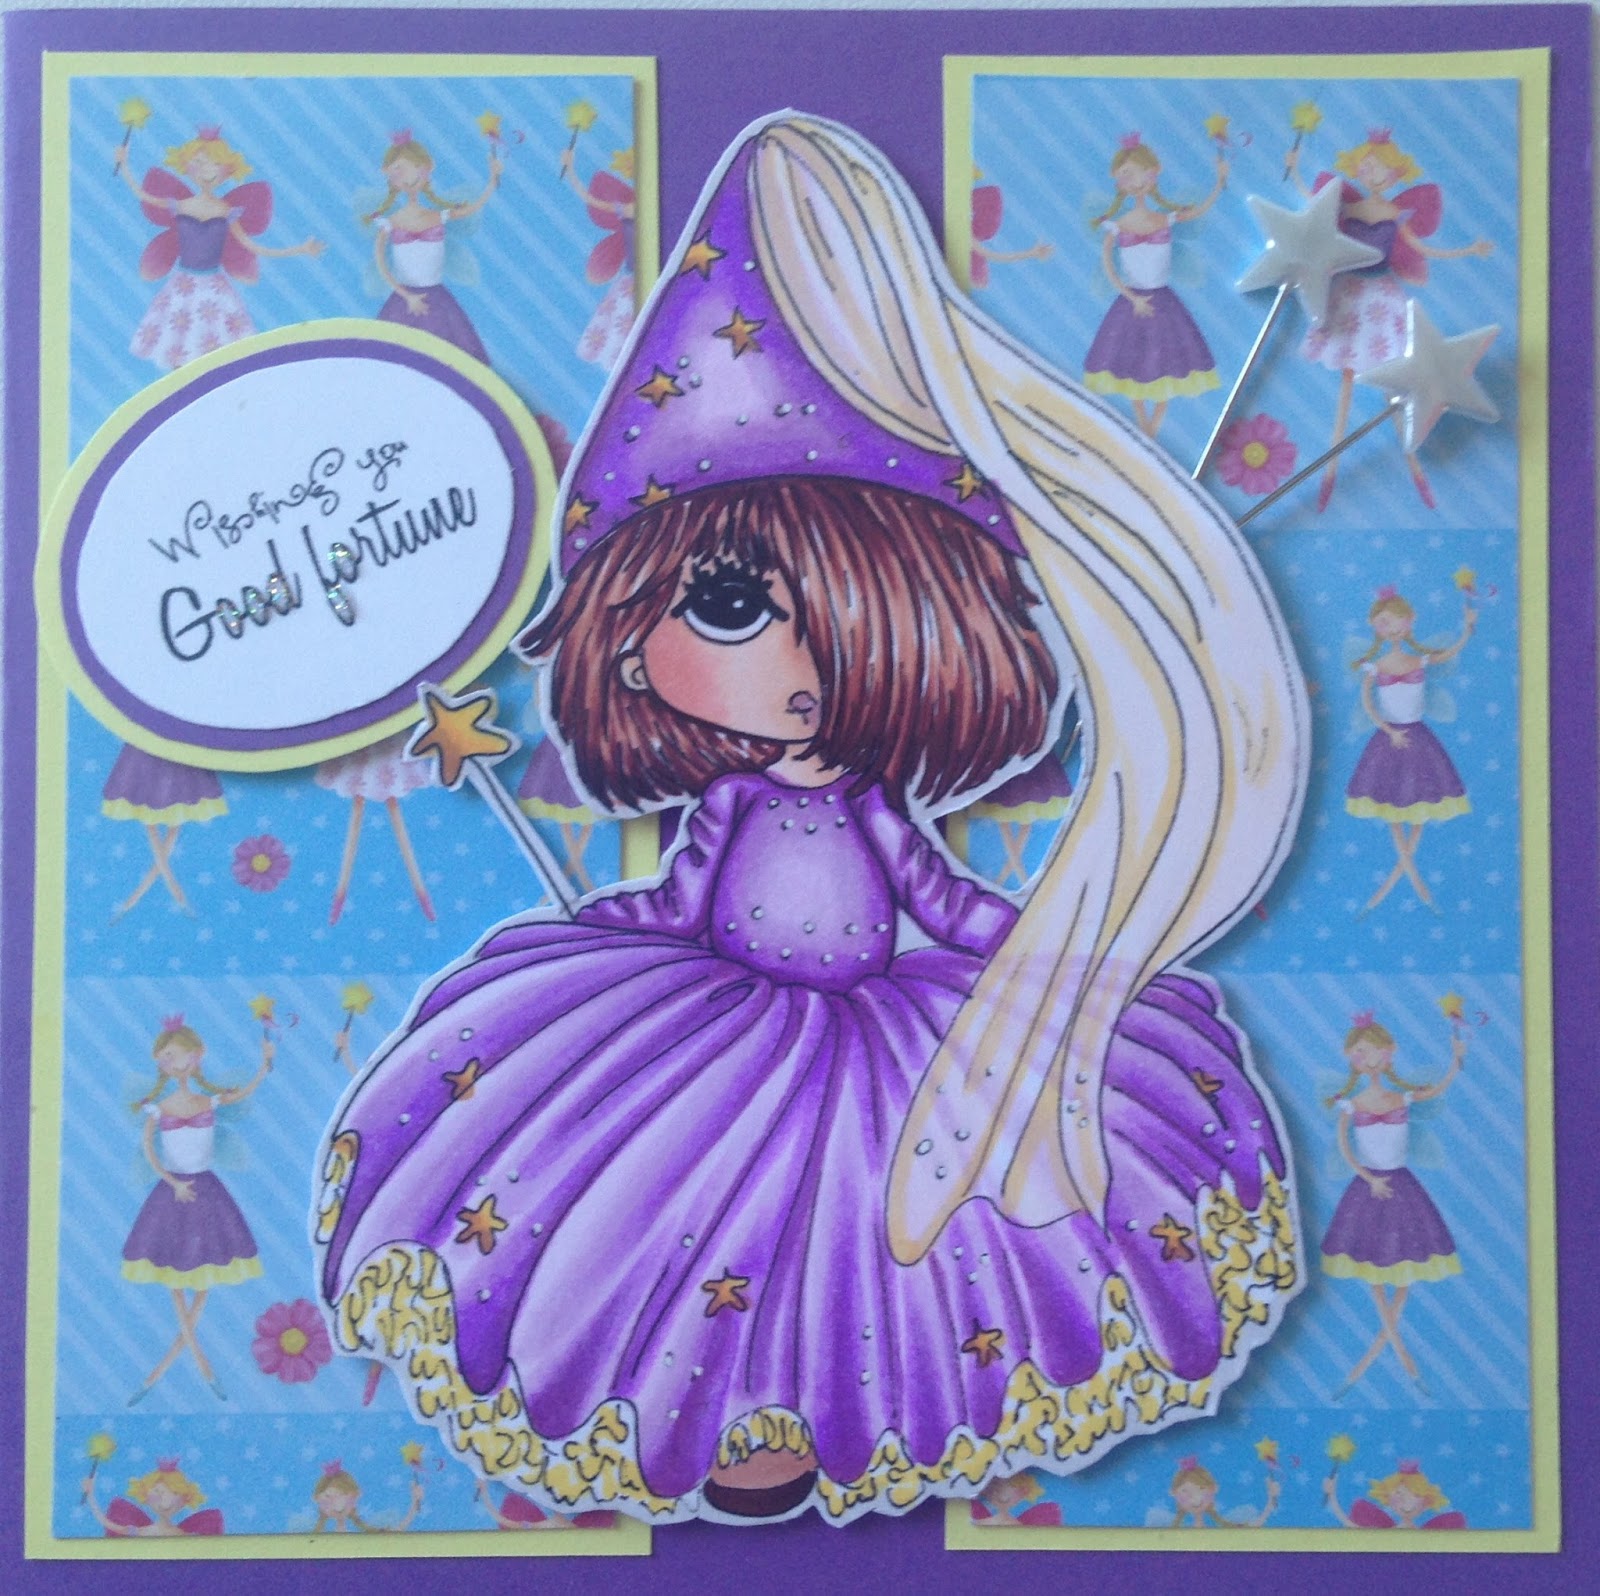
As usual time is flying and too long time has passed since I last posted in here. I've practically not coloured much since my birthday in late August as I've been really busy with other things, and I do miss it. I hope 2017 will be a better colouring year for me.

Last weekend I took some badly needed ME-time and coloured up the November 2016 pencil class from Kit and Clowder. Should you ever want to learn to colour with either markers (different kinds are mentioned in class) or pencils (also different kinds are mentioned), this is definitely the place to learn. The classes contains both video instructions as well as a booklet.

Alyce Keegan - the owner of Kit and Clowder - offers feedback on ALL images to students in her classes, whether projects from class or not, in which she offer you great advice, gives tips and tricks etc.. Her facebook group is awesome, everybody are so supportive and we help each other with everything.

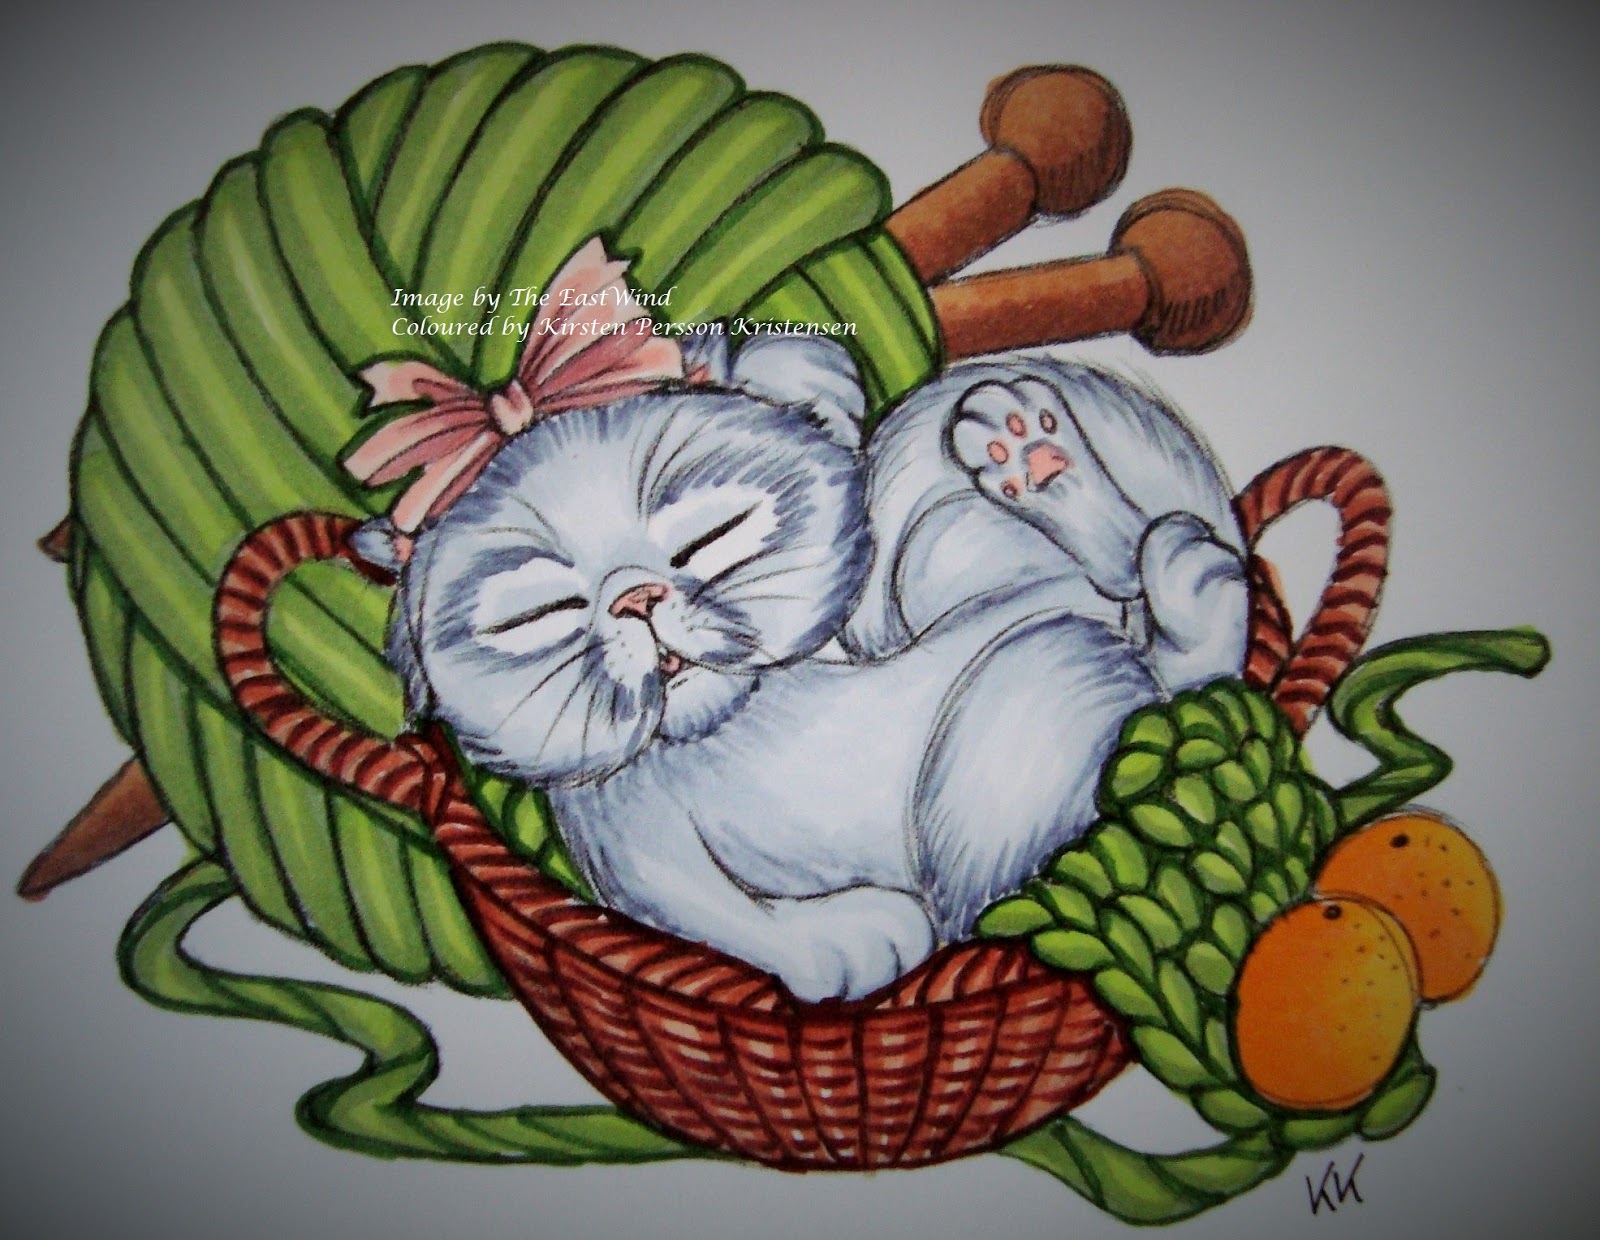
Well, back to my image of the Christmas mouse:


I know, I know, there's room for improvement in my colouring - and that being said, I AM a student and still very much learning. But I'm really content with my mouse and very proud of myself for having tackled this image. There are so many techniques involved, but it's not impossible for a newbie either to make just as good or even better. 

If you cannot see it, let me explain: You are looking from the outside and in through a frozen window, where you see the mouse sitting on a bauble on a Christmas Tree (the green behind him). 
When I was a child a long time ago, I remember seeing icing on the inside of a window, and if you wanted to look out you breathed on the window and then wiped the ice off when it melted. Can you see, where I'm going? 

I have coloured him with my Faber Castell Polychromos pencils, which I truly love using. 

The photo isn't the best due to the rather dark daylight up here in Denmark at the moment, so the picture is looking more blue than it is in real life. I'm sorry about that, but unfortunately there's nothing I can do about it this time of year. 

Please feel free to leave me a comment, if you like my project, and if you want to see my cards/projects on a regular basis - even though I'm still a bit unstable at the moment - please join my blog.

Be happy crafting! 


Sunday 20 November 2016

It's been ages

Hi There!

It's been ages, since I've been in here. I'm so sorry about that. I did, however, a couple of weeks back leave a post on my other blog (see the link on the right side below my photo) if you'd like to see it.

I've been so busy adjusting to my new job, which is very different from anything I've tried before and there's been tonnes of computer programmes to learn.  I'm sent on various courses on various locations around the municipality to learn new stuff on a regular basis, so I'm really tired when I get home at night and have finished the dinner and house chores that I only have energy to surf a bit on Facebook.

I've hardly done any colouring at all. So again I have to seek the computer files for images/cards that I've not shown in here before. Please bear with me, I hope I'll have more energy some time after Christmas.

Well, I'm going to show you a card I loved making - Gosh, I can see it's already 1½ years old - but I'm sure it's not been shown before. It's an image called "Cafe" from the very talented Alicia Bel and it illustrates me in the morning before coffee except my curls are real and I don't have those cute slippers LOL.


I have coloured her with my copic markers. The sentiment is from SimplyBStamps and the sheep are from Amy Doodle Stamps. 

I put on the sheep to illustrate the she's still half asleep as I am until I get the first sip of coffee. 

I love this card, but I think I gave it up as a prize for a Bingo game in the food club last year, so one of my friends ended up with her. 

Please leave me a comment if you like my card, and if you want to see my cards/projects on a regular basis - even though I'm a bit unstable posting at the moment - please join my blog. 

Be happy crafting!


Sunday 9 October 2016

A new Christening in the family

Hi There!

This weekend we celebrated the christening of Karen, my eldest niece and her boyfriends' 3 month old daughter.

My family stayed in a summerhouse belonging to the brother of my brother-in-law (my big sisters husband) which is located quite near their summerhouse where we often are. But on this occassion that summerhouse was the residence of the new little family and the families of their siblings, which were the christening party - does this make any sense, or is it only in my head it makes sense?

Well, anyway we were supposed to be at the church at 10.45am this morning, so we arrived a bit early to make sure we were able to get seats, so we could see the ceremony. My big sister was "the official photographer" in the church.

Karen was adorable. She was wearing a christening dress that my big sister had made for her children 34 years ago, and in which my eldest nephew and his little sister - Karens mother - wore at their christenings. Only difference was the colour of the ribbons on the dress. Blue for boy and pink/red for girl. Karens name and date of christening will be embroidered on the dress as their names and christenings dates are.

I've made this Fairy Godmother Sugi card for Karen. The image is from Lacy Sunshine, who has some awesome images and I thought this one was really suitable for the occassion, where you wish the baby all the best in life.


I put a "Wishing you good fortune" sentiment on it and a couple of wands as well. The background paper is also featuring fairies with wands, so it couldn't be more perfect.

But since I'd made special projects for my nephews two daughters, Freyja and Luna, I also wanted to do something special for Karen.

So I made this gorgeous special project for her (if I may say so myself).

I had a good look around on Google for free cliparts and stumbled across this cute baby image. It was already coloured, so all I had to do was find suitable background paper and how to make the image look the best. I think I nailed it pretty well. The image was not enough though, so I decided to make a flower arrangement on both sides of the opening. Only two of the flowers on each side are not home made, but they just looked good with the rest of the flowers.


When opening the card you can see other cliparts that I cut out. On the left side is a teddy bear. there's nothing behind the front image, as I had imagined I'd put a money note there, but I wasn't able to fasten it properly, so I left that space empty and put the note in the other card.

On the center piece, there are two pink and white bows, two bibs, then Karens name in pink gems, An image of a little princess duck sitting on a pillow, a couple of butterflies and a baby turtle. 
on the right side is a larger bib, a pair of pink socks and some baby clothes (don't know what it's called in English). 


On the back of the card I put an image of a rocking hourse. Everything on the card is of course baby pink. The sentiment says Christening, the date and the name of the church. 
The card is held together with a piece of pink ribbon tied in a bow on the front. 


I hope you like my two projects.

Please leave me a comment if you like my card, and if you want to see my cards/projects on a regular basis, please join my blog.

Be happy crafting!


Monday 3 October 2016

18th Birthday celebration

Hi There,

This weekend I went to Copenhagen to take part in the celebration of my youngest niece and God daughter's 18th birthday. Her birthday was earlier in the week, but it was decided to celebrate it on a weekend, so as much of her family as possible could take part.

Unfortunately for her, her school changed the date for their prom (she's a senior now) to fall on Saturday, when the party was to be held, but in my family we use every opportunity to celebrate and the center of attention doesn't even have to be present. We've done that before with my eldest niece and nephew LOL.

I bought the stamp from Saturated Canary a while back (she's one of the birthday teens) and immediately had my niece in mind. It was a pleasure to to make it for her, and she was really happy to have it. Since she's saving for a drivers license, I added a money note as well to help her get it earlier.


I added the flags (which I made myself and coloured them in matching colours and put them on a yellow thread. Then I put some pearls in three corners and a Birthday sentiment (sorry, I don't recall from which company).

I hope you like her too,

Please leave me a comment if you like my card, and if you want to see my cards/projects on a regular basis, please join my blog.

Be happy crafting!

Sunday 25 September 2016

Old project not shown before

Hi there!

I still have some old projects that I've not shown here on the blog before. And today I'm going to show you the birthday card I gave my big sister last year.

It's "Penny cover eyes" by Make It Crafty. They have so many gorgeous digi stamps, and this one is from a collection, I don't remember which one, I'm afraid.


 I used some very festive backing paper I once bought in Belgium, when I flew down for a craft exhibition where I was going to demonstrate Pergamano together with a lot of my foreign teacher friends.

My host took me shopping to this great shop where things were sooo cheap and the papers were very different from what we can get up here in Denmark, so of course I had to get some.

I don't remember anymore, what gift I got my sister, but it was supposed to be a surprise, hence the sentiment. And I thought the digi was sooo suitable for this. I bet you are also asked to put your hands over your eyes, if somebody wants to present you with a surprise.

I hope you like her, I had much fun colouring her.

Please leave me a comment if you like my card, and if you want to see my cards/projects on a regular basis, please join my blog.

Be happy crafting!


Saturday 17 September 2016

Another Saturated Canary project

Hi there!

The project, I'm going to show you today, was a freebie a while ago in the Saturated Canary Facebook Group which has now been closed (which is sooo sad, as the images are awesome).

It's perfect for small projects, it doesn't take very long to colour her and finally, it's great for experimenting with skin and hair colour combos.


I have a few notebooks aprox. 10 x 10 cm in 4 different colours which I bought on an exhibition once. I felt she was perfect to put on top of the blue one.

Here's a look where you can see, she's on a notebook:


I distressed the edge around her in blue to fit the cover of the notebook and then added a few punched out flowers on opposite corners.

The little stars I've used as the flower centres are from my bow tie die. They work perfectly as centres on the small punched out flowers.

I gave her to one of my friends, with whom I do crafts regularly, when she last visited. Her birthday is coming up soon, so it was a small present instead of a birthday card.

Please leave me a comment if you like my card, and if you want to see my cards/projects on a regular basis, please join my blog.

Be happy crafting!

Sunday 11 September 2016

Saturated Canary card

Hi there,

Today I'll show you a card with a Saturated Canary image (Faces 2 from the bundle Faces).

I've chosen to colour this image as a birthday card to my new boss, who's turning 50 in a couple of weeks. I think she's got other things on her mind than reading my blog, so I dare to show it in here before she gets it.

I had hoped to find a sentiment saying something like "A little bird told me...", which I thought would be perfect for the image, but ended up with a fun sentiment instead.


I've distressed the layers (isn't that when the edges are ruffled?). Do I need to do that on the edges of the card as well? I'm new to this, so I'm a bit uncertain of it.

I've coloured the big yellow/orange flower in the corner. Originally it's beige with brownish petal tops.

The  two blue flowers I made two months ago, when I had nothing else to do but relax and make flowers and melt HAMA pearls for their centre. I made a big glas with about 300 flowers in different colours to last me a while I hope.

The leaves are from my bird punch and the swirls are cut off stems from the big flowers twirled around a tooth pick. There's no need to throw the stems away, when they can be used this way.

Please leave me a message if you like my card. and feel free to join my blog if you'd like to see my cards/projects on a regular basis.

Be happy crafting!

Sunday 4 September 2016

Late graduation card

Hi there!

Today I am going to show you a graduation card I was asked to make by one of my class mates at business school. Her daughter (or was it granddaughter?) graduated in music and she needed a card to that effect.

I chose to do "Rory's graduation" by Lacy Sunshine because I love this digi and don't have that many graduation digis, where the girl/boy look the right age, and I think Rory can get away with it.


I know it's late to show this card thinking of normal graduation dates in Denmark and that's entirely my fault. I'm so far behind showing my finished cards, or cards that's already been shown on Facebook that I'm having problems remembering if I already posted it in here, but I'm sure, I've not shown this one yet.

Since this girl graduated in music, I had to put some music paper on the background and I also happened to have a few sticker notes (they are kind of big, so I only used one of those). I also added and extra graduation paper, which I distressed and also burnt at the edges so it looks a bit old.

I added a big marguerit flower, two smaller white flowers and two of my home made roses and a branch with leaves.

I was told that the girl was very happy with the card, so I'm very satisfied with how it turned out.

Please leave a comment if you like my card and if you want to see my cards/projects on a regular basis, please join my blog.

Be happy crafting!

Wednesday 24 August 2016

Back to school

Hi there!

No, I'm not going back to school LOL and then again I am, but not to study. I'll be working in the office at a school from September 1st., Yippie!! And best of all it's only 10 minutes away by car.

Well, my card is also called "Back to school", so there's a double meaning in the title of this post.


It was my intention to abandon this card on the doorstep of the middle school only a couple of hundred meters from my house, but then I was soo busy the day school started, that I totally forgot all about it. Maybe I can abandon her when they start again after the next school holiday in week 42. In that case, you'll find the post on my Art Abandonment blog. 

I've used a Tiddly Ink image featuring my favourite image, Wryn, as a school girl. I've put on a sentiment, and the "back to school" text is from an alphabet die, that I have. I drew and coloured the crossing pencils myself. 

It was a fun image to colour and I think I managed to do the big shadow on her hat all right.

I hope you like her. I'll put her in the "Back to School" challenge presently running at Tiddly Ink. 

Feel free to leave me a message to let me know, if you like my cards.

Please join my blog, if you would like to see my projects on a regular basis. 

Be happy crafting!


Sunday 14 August 2016

I'm not sure I like it!

Hi there,

A while back I made this card, and I'm not sure at all, I like the way I put it together. I'll let you judge yourself, and then I'll give you my view below the photo.


I love everything about the card except the blue and green fish! There, I've said it! What first seemed to be a great idea, absolutely ruined my joy over this card.

I found the fish (and in other colours as well) in a local supermarket and thought "they would be so nice to put on a mermaid card", but as it turned out, they are way too thick and were really hard to glue on, and the minute they stuck to the card and I removed my hands, I so regretted having put them there.

I think everything else on the card is in harmony and then these two wobbly, thick fish were such a disappointment and they are stuck so well, that I'll ruin the card, if I remove them.

Well, I've shown you now, that I'm also capable of making cards that are failed, and I'd usually not show them to you. Of course it's a pity, and I have no idea what to do with this card, so any suggestions will be very welcome.

Please feel free to leave me a comment, if you like my cards, and also to join my blogs, if you'd like to see my projects on a regular basis.

Be happy crafting!
Hugs, Kirsten

Saturday 6 August 2016

Judith Maslen is making digital stamps too

Hi there! 

Have you seen the new Etsy shop called "BigSplashDigiStamps"? 

It's a shop belonging to Judith Maslen - Yes, Judith has started designing digi stamps as well. Her images are very suited for other kinds of colouring thanjust on Parchment. 

I've coloured up her Toadstool Pixie with my copics. He is also in the shop. Go check it out. If you don't want to use these digis for colouring with other medias than parchment paints, you can easily use it as, such, just put a parchment border of your own design around him.


Since a toadstool is found in the forrest, I've added some die cut trees and pine cones as well as a deer and a dragonfly and kept the overall colours in green. He has a little glitter on his wings. And of course the whole picture needed a nice sentiment. 

I've been asking Judith about doing this for a long time because I love her parchment patterns and find that without their borders, they could easily be used for the way I colour now. Finally she gave in and made a sample digi, which she asked me to colour. Seing the image was good enough for this, she went for it. 

Here's my first coloured sample image from Judith (this is not in the shop). 


It was a pleasure to colour this bowling lady and to think up a design for her card. So I hope you like it too.

Go check out the Etsy shop "BigSplashDigiStamps", I'm sure you'll like what you see. Judith will be adding images on a regular basis. 

Feel free to leave me a message to let me know, if you like my cards.

Please join my blogs, if you would like to see my projects on a regular basis. 

Be happy crafting!
Hugs, Kirsten

Friday 5 August 2016

Another free digi from the 10.000 celebrations coloured now

Hi There!

I think this might be the last free image from the 10.000 member celebration at Kit and Clowder that I've coloured and put on a card now. (I have a couple still not on a card, but I'll get there eventually).

I loved colouring her. I had some challenges with the flowers and details, as they are rather small.
I'm pretty satisfied with the dress in oranges and yellow tones though.


I decided to go with pink and teal papers because I used those colours for the flowers. I've used white, pink and teal punched out flowers - all home made, and added some punched out leaves.

I'm not used to using a lot of flowers of different sizes and shapes on my cards, and here I've only used two kinds. As I grow more used to it and confident as well, I hope I can get the hang of it. I see so many beautiful projects out there with flowers and lace and other embellishments, and long to be able to make something like that. I've started now, so I'm on my way!

Feel free to leave me a message to let me know, if you like my cards.

Please join my blogs, if you would like to see my projects on a regular basis.

Be happy Crafting!
Hugs, Kirsten

I will enter this card in the following challenges:

1. http://sasayakiglitter.blogspot.dk/2016/08/sasayaki-glitter-august-challenge-use.html 


Sunday 31 July 2016

A sister blog

Hi there,

Unfortunately I'm not clever enough to make a new page on this blog, so I had to open a new blog with my Art Abandonment projects. It's address is: https://kipekr-artabandonment.blogspot.dk/


Somehow it is connected to this blog, as all my followers automatically were added. I don't think they can be separated, since I'm the owner of both, but it does mean, that you'll get to see all my card projects.

The projects on the Art Abandonment page will not be shown in here, as I'd have to do double work then, and my time is not for that.

Enjoy that blog too and read about this other journey I'm taking too.

Be happy crafting! - and don't be afraid to go where the colouring journey leads you.

Hugs, Kirsten

Friday 29 July 2016

Busy colouring last weekend

Hi There!

Last weekend was a very busy colouring weekend for me. I did the 2 images I showed you in my last post and then 3 more, which I'll show you here.

I also did this image from Scrappers Delights I'm showing you below. I've had her for about half a year and had promised Janice Cullen Collier to colour her, as soon as I got more time on my hands. I felt I couldn't postpone this any longer since I'm on holiday, so I threw myself into a colouring weekend.


I had this gorgeous backing paper, which I thought was really suitable for the "Spread your wings Fairy". I added some extra flowers in the colours of the backing paper and a butterfly die cut from
green glitter paper.

I LOVE Yampuffs images, they are such great practice of particularly hair, skin and pleats. I noticed that Yampuff had put up a new image, which was intended for a summer competition and since I've done a Create & Learn class with an underwater scene, I was not afraid to enter the competition. Last year I entered Yampuffs Spring competition but alas I didn't win, but the exitement of participating is also much fun. This time I only submitted a colouring, but she'll be put on a card later or maybe in a frame.


As if the Kit and Clowder celebration wasn't enough, Aurora Wings celebrated reaching 1.000 members last weekend too, with lots of games, and had a release of some super images and offered this cutie "Acorn Sprite" for free at the end of the party, and to join it in a colouring competition, if you wanted. He's also a colouring, but will be put on a card later.

I've kept him in rather dark autumn colours since that's the time of year you find acorns in nature.


 I hope you like the projects I made, feel free to leave me a message below, if you do.

NEWS - NEWS - NEWS!
I'll be adding one more page to this blog with my Art Abandonment projects. Much more about that later.

Please join my blog, if you would like to see my cards on a regular basis.

Be Happy Crafting!
Hugs, Kirsten

Tuesday 26 July 2016

10.000 member celebration in Kit and Clowder

Hi There!

This weekend was the celebration of reaching 10.000 members in Kit and Clowder, where I get my colouring classes. It was AWESOME! 3 days of games, freebies, winning prizes and finally a free Marker 101 class.

Alyce Keegan really outdid herself with this weekend, I cannot begin to imagine how much work she's put into it, knowing how much work we Clowdies give her on a day to day basis, with feedback, preparing Create and Learn monthly classes, other classes arranging Bingo, Book Club and much much more. A lot of sponsors of Kit and Clowder were represented and offered discount coupons as well as offered lots of prizes and some even freebies. A big thanks for a great weekend.

Today I'll show you two colourings, I made with two freebies from the weekend.

Scrappers Delights kindly offered this freebie "K&C 10.000", which I coloured with my Copics.


It was so much fun colouring the balloons and not at all as difficult as it might look. I coloured her red haired and with a green outfit - an internal joke between Alyce and myself.

The EastWind kindly offered this freebie "Super Chunky", which I think looks like Alyces' cat, Lila Bear.


I've never owned a cat, and not yet done the Animal Class (lazyness on my part, since I've had it for about a year now), so please bear with me. My C5 ran out of ink, while colouring, so I had to kind of force it to put some strokes down.

It is on purpose that I've not blended the mid and light green colours more, and I think it has a nice effect this way.

All posts (games, competitions, freebies and the free Marker 101 class) are still open until July 30th, so please join us at Kit and Clowder facebook group for a chance to win some awesome prizes . We'd love to have you and share this awesome group with you.

Feel free to leave a message to let me know, if you like my cards.

Please join my blog, if you would like to see my projects on a regular basis.

Be Happy Crafting!
Hugs, Kirsten

I'm back!

Hi There!

WOW, 2 months have almost gone since my last post, well it has it's reasons. As mentioned in my last post I was studying for my exam in economics, which I'm happy to say I passed with a nice 10 (a B if your grading system is different from ours in Denmark) and I'm very, very satisfied with this.

However, about a week after my post on May 31st I sat writing on my essay for 5 hours in a row, which was too much for my back, so when I tried to get up, my back locked in a haft standing, half sitting position It has taken all that time and up till last Thursday with physiotherapy treatment 1 - 2 times per week, where I've not been permitted to do anything (house or garden work), and all I've been able to do was cooking (I had to eat you know LOL), laying on the sofa watching TV and generally vegetating.

Then Thursday I finished physiotherapy and am pain free, which I've not been for years, so it's a great feeling. I was also allowed to walk longer distances and work 10 min a day in the garden (to begin with). So far I've had 3 loong walks into the countryside - I live right next to the old railway tracks here in Aalestrup. And I had help from a couple of neighbours to cut my corner hedge yesterday, well it was mostly them working - I did what I could and then served cool drinks and coffee.

So happy to be on the mend.

Now, I'm happy to be back and cannot wait to show you some projects. I'll post two in my next post.

Be happy Crafting!
Hugs, Kirsten

Tuesday 31 May 2016

Nothing to show

Hi there,

Today I have no cards to show you. I just wanted to let you know, that I'm still around and at the moment only making cards for special occassions in my family, which I'll post when they've taken place.

I'm still working on my essay for my exam in economics, which is now only 1 month away. That is really hard work, I can tell you, for a language mind to change to economics.
I do hope that I'll manage at least to pass the exam. Please cross your fingers on June 23rd.

I've been asked if I want to take a supplementary exam on June 17th, but I'm very much in doubt if I can manage to do both. Luckily I can wait to commit to this exam for another 1½ weeks, so if I can finish my essay before that, I MIGHT do the second exam, but I'm taking one step at the time.

Well, until I'm over the exam or exams the blog will be quiet. I'll be back very soon after that, and I hope that you'll come back to take a peak of my cards again by then.

Be happy crafting!
Hugs, Kirsten

Sunday 15 May 2016

Birthday card for a brother-in-law

Hi There,

Today I'm going to show you the birthday card I made for my big sisters husband, whose birthday was last week.

I was given the image by the wonderful Sarah Burr, who is a fellow Clowdie of mine. She draw some awesome digis and made this image available for those of use, who wanted it.


The image actually looks a bit like my brother-in-law and when colouring it in black/gray/white and with brown eyes it really looks like him - at least to me it does.

I've chosen a background, I've learned in a background class in Kit and Clowder, using alcohol to make the "bubbles" in the colouring.

I made it a cas card adding only a few gems at the corners. I don't think guys like too much embellishment on their cards, so I kept it simple.

Sarah Burr has already seen the finished project, but I didn't want to publish it until my Brother-in-Law had received the card.

Feel free to leave a message to let me know, if you like my card.

Please join my blog, if you would like to see my project on a regular basis.

Be happy crafting!

Friday 6 May 2016

Frankie Knuckles by Kenny K

Hi there,

Today I'll show you another card made a couple of months ago and was given to my eldest nephew for his birthday in February.

The image i by Kenny K and a great image it is. There are so few male images out there, so I'm always very happy when I finally find one. I don't want to use the same image for my male relatives, so it's always hard work finding these digis, when another male birthday is coming up.


I'm pretty happy with the way he turned out. And I didn't want a lot of embellishments to take focus from him - and I'm not sure my male relatives likes bows and flowers on their cards, so it ended up being a CAS card with only dark purple pearls in difference sizes to match his background.

I put him on a dark purple background matching his blouse and the pearls and the second background of the sentiment. I also used three nuances of brown card as backgrounds.

Feel free to leave a message to let me know, if you like my card.

Please join my blog, if you would like to see my projects on a regular basis.

Be happy crafting!

Monday 25 April 2016

Best friends by Polka Doodles

Hi there,

Time is running so fast at the moment, please, excuse me for not having uploaded for a while.

I'm back at school - have been for 2 months now, since I had pneumonia. A very busy 2 months it has been, and today I began a period of 4 weeks working in the economic department of a company to gain some experience and later write an essay about it and then an exam as well in about two months time, so until then I might not upload that regularly. This education means a lot to me and I have to concentrate on it.

I will however try to make a card now and then to keep stress away and relax. And now, back to my cards.

This is such a cute card and I was amazed how well it was possible to colour the dress in yellow.  I've always been told that yellow was now easy to use. The motive is the Best Friends digi from Polka Doodles.


I kept the card in earth colours (I think it's called that) and added matching roses in opposite corners and brown patterned pearls/gems in the other two corners. The message I wrote in Word, cut it out and put it on dark brown card.

Feel free to leave a message to let me know, if you like my card.

Please join my blog, if you would like to se my projects on a regular basis.

Be happy crafting!

Saturday 2 April 2016

For my pregnant niece

Hi there,

Some time ago I made this gorgeous digi into a card for my pregnant niece. I've used this image for the card: Sherri Ann Baldy "Lil Ragamuffin Pickles", isn't she gorgeous?

I know that some people get a craving for special foods (or other stuff) when they're pregnant, however, I don't know if that's the case with my niece, but I thought the digi was soo suitable for this occassion anyway.


I have not written down the copic colours I've used, but I might be able to reconstruct them, should any of you wish so, then just send me and email of PM on Facebook.

The card is really simple, and I think it is all right, because I wanted all focus on the image itself.

Lower background paper is green, to which I added a white background paper. I had some left over  paper with muffins/cupcakes on, which was soo suitable for her. Then I put on the "baby" die cut text on and a green pearl in both upper corners. On top of everything I put the digi. Very simple but beautiful.

Feel free to leave a message to let me know, if you like my card.

Please join my blog, if you would like to se my projects on a regular basis.

Be happy crafting!

Friday 25 March 2016

My first Ppinkydoll project

Hi there,

Today I will show you a card I made yesterday. The image used is "Mily" from Ppinkydolls, She was a freebie I got on Tuesday.

I've always been a bit scared of colouring the Ppinkydoll images, because there's already some shadow on them.

Well, colouring Mily was a pleasure and it just shows, that you have to jump in and just do it. I was pretty happy when I'd finished colouring and I thought I got away with it.


I've used bordeaux backing paper (cardboard) and the top layer is from a 30 x 30 cm paper pad I have. I thought these papers went very well with the colours I used on her.

I added a birthday greeting on bordeaux cardboard and some white pearls to balance the greeting. I was out of bordeaux pearls, but I thought the white ones were ok to put on.

I also added three homemade roses i opposite corners in colours matching the stripes on the top layer as well as the colours used on the image. I'll be running out of my homemade roses soon, so I have to pull my act together and start assembling the next batch, which luckily is ready for assembling. It just take a lot of time to do so.

Well, that was it from me for now. Feel free to leave a message to let me know, if you like my card. 

Please join my blog, if you would like to see my projects on a regular basis.

Be happy crafting!


Monday 21 March 2016

Easter Bestie

Hi there!

Today the reminder challenge over at the Scrapbook Stamp Society challenge blog is
Anything Goes – Option : Easter.

For my card I used Sherri Ann Baldy “IMG206”. You can find it by clicking the image title.

This is such a cute image and I love that she’s hugging that egg. I decided to colour her up in bright spring colours such as lighter teal and yellow.

I know, that I ought to get started on my animal classes, as it’s obvious I need to learn something about colouring those big ears and the slippers and the toy rabbit. BUT on the other hand, I enjoy to colour so much that class will come when I’m good and ready for it, and in the meantime, you all will have to bear with me, when I’m colouring animals.


I used the following Copic markers for the project:

Skin: E11, E21, E00, E000, R20 and E04
Eyes and hair: E18 E15 and E13
Heart + flower: R27 Leaves: G17
Bows + left stocking: Y17, Y15, Y11 and YR14 on dots
Trousers + right stocking: BG13, BG23 and BG10
Egg: C1
Hat + rabbit: C5, C3, C2, C1 and RV10
Slippers: RV10, E95, C3 and C2

I had some lovely chequered backing paper in pretty much the same colours I used for the image itself, so of course I wanted to use that. It is put on yellow and orange cardboard. Then I used a circle die I have and made a yellow die cut of it upon which I put a round layer of the chequered paper. Finally the image was put on. I had a little chicken to put on as well, which may or may not have laid the egg she’s holding LOL. And I added yellow melted HAMA pearls in the corners.

I hope you like my card. Feel free to leave a message to let me know. Please join my blog if you would like to see my cards on a regular basis.

Be Happy Crafting!

I have entered this card into these challenges:

1. http://glitternsparklechallengeblog.blogspot.dk/2016/03/challenge-181.html 
    (no. 9)
2. 

Wednesday 16 March 2016

Freyja's 4th birthday card

Hi There,

Today I'll show you a card I made a few weeks back for my nephews eldest daughter, Freyja.

I used Alicia Bells image "Cumpleaños", which could have been made for this occassion. I cannot remember if the presents are a stamp or a digi (or who the artist is, I'm so sorry for my bad memory).
 Freyja turned 4 years old and there are 4 candles on the birthday cake. It couldn't be more perfect.

I used my copics to colour the image, I'm sorry, but I didn't write down, which ones I used. I might be able to remember it, should anybody be interested.


My background is a piece of red cardboard upon which I glued a yellow confetti coloured piece of paper. I cut out the image and the presents and layered them so they fit on the card. Once I bought a jar of foam numbers, and luckily there was a number 4 left, so I put that in a corner. 

Since little girls love everything that sparkles (well, to be honest, old gals like me also love it), I added some coloured gems all over the cards. 

I hope you like my card. Feel free to leave a message to let me know. Please join my blog if you would like to see my projects on a regular basis.

Be happy crafting!


Monday 7 March 2016

Lace or ribbon

Hi there!

Today the reminder challenge over at the Scrapbook Stamp Society challenge blog is Anything Goes – Option : Lace or ribbon.

For my card I used Sherri Ann Baldy “IMG631 – Raggedy Rosie”. You can find it by clicking the image title.

Here I’ve tried something new. I have tried to colour the image with my Perga Liner pencils and I think it turned out ok. It might have been better, if I’d used the aquarelle paper for it, but I’ve had the image printed for a long time and felt like experimenting with my various pencils.

My pencil stash consists of the following brands: Perga Liners, Caran D’ache, Derwent and Faber Castell and some unknown, cheap brands as well. The four mentioned by name is my preferred go to pencils when colouring. I reserve the FC pencils for my colouring classes.

As some of you know, Perga Liners comes in A (aquarelle) and B (basic) pencils. The B-pencils are used for dry technique and the A-pencils can be used for both wet and dry technique. I have used a mixture on my image.


I used the following Perga Liner pencils for the project:

Skin: B3, A17, A18 and B11
Hair: A14, B7 and A15
Eyes: B4 and B16
Blouse and socks: B2, B13 and B11
Apron + bows on socks: A7, B14 and A8
Heart: B11
Shoes: B2 and A2
Border: Having roughed up the border on the image and the sentiment squares, I used my Copic V17 to colour it.

I put a purple ribbon under the image and around the second backing paper and glued it to the back of the purple backing paper. I had to make a separate bow to put on, as I’m not expert on just tying a bow with the actual ribbon used. Hope you understand what I’m trying to say here.

I added the sentiments on either side of the ribbon to balance the picture and added green peals in the corners.  

I hope you like my card. Feel free to leave a message to let me know. Please join my blog if you would like to see my projects on a regular basis.

Be Happy Crafting!

Friday 4 March 2016

My entry in the Champion of Champions Challenge

Hi there!

Today I’m showing my project in the Champion of Champions challenge, which is for DT members who have won in one of the categories in the WWWODT challenges during the past year.

For my project I’ve used Sherri Ann Baldy ”IMG811” You can find it by clicking the image title.

I used the Golden Globe Awards as setting as my inspirational project in the Champion of Champions challenge, and here I’ve used a photo shoot in Paris, France for this project. I honestly don’t know, from where I get these ideas, they kind of just pop into my head. My imagination is running wild sometimes LOL.


Here we have a model on a photo shoot near the sights of Paris. Maybe there’s a paparazzi hidden in the foliage clicking away too J. All the stamped “stars” represent the flashlights from the photographers’ cameras.


I used the following Copic markers for the project:

Skin: E11, E21, E00, E000, R20 and E04
Hair: E18, E15 and E31
Blouse and skirt: RV69, RV66 and RV55
Flower: RV69, RV55 and YG67
Apron: BG09, BG13 an BG11
Sunglasses: BG09, E18 and C0
Jewelry: BG13

I had some backing paper with among other things the Eiffel Tower and some baguettes etc., which I found suitable for this project (even if it more or less ended up covered by embellishments).

I’ve added a stamped camera and the “click” sentiments and stamped the flashlights as mentioned before on her background. In case there was a paparazzi hidden in the foliage, I covered the camera a bit with the ivy leaves.

I used a die cut film strip and put in two sights from Paris – the Notre Dame and l’Eglise Sacre Coeur, which I cut out from a travel brochure.

I hope you like my card. Feel free to leave a message to let me know. Please join my blog if you would like to see my projects on a regular basis.

Be Happy Crafting!

Monday 29 February 2016

The Champion of Champions Challenge

Hi there!

Today I’m also showing you my entry to the Champion of Champions challenge in the World Wide Open Design Team challenge blog. This challenge is only open for winners from all categories in the monthly World Wide Open Design Team Challenges from July 2015 through to February 2016. And my very first DT project back in August won one of the categories. 

For my project I’ve used Sherri Ann Baldy ”IMG812”. You can find it by clicking the image title.

The image is one of many in the Fashionista series. It was not hard to come up with an idea, as I was watching the Golden Globe show the weekend before I made the card. What would be more obvious than to have my fashionista pose on “the red carpet”?

I decided to keep my card in green and pink colours as they are very eye catching when put together and that’s what you want, when you participate in challenges.

As you can see, my fashionista won the award for the Best Costume Design. I don’t know if the Golden Gobe Awards actually have this award, so I visited the Oscar website and saw this category there. So maybe it should have been the Oscars instead, which would be very appropriate since it was Oscar night yesterday. LOL


I used the following Copic markers for the project:

Skin: E11, E21, E00, E000, R20 and E04
Hair: E15, E97 and E13
Sunglasses: E35, C5 and Gelpen Neon Pink
Dress: YG63, YG03, YG11, Gelpen
Bow: Neon Pink and R27
Roses: Gelpen Neon Pink + Gelpen Neon Yellow and YG63
Shoes: Gelpen Neon Pink
Palm trees: E15, E3, G94, YG17, YG11 and YG03

As embellishments on the card, I’ve used a circle sentiment is from Digistamps4joy and a homemade “Best costume design” sentiment.

The palm trees are from Opal Manor (my go to for embellishments) and I’ve resized them to suit my project.

Finally, I added four homemade roses in green and pink to match the colour scheme of the project.

You will find the challenge here: http://championofchampionsdtchallenge.blogspot.dk/

I hope you like my card. Feel free to leave a message to let me know. Please join my blog if you would like to see my projects on a regular basis.

Be Happy Crafting!


Butterfly Betsy

Hi there!

Today I’m showing my project in the World Wide Open Design Team challenge blog. As usual the theme is “Anything goes”.

For my project I’ve used Sherri Ann Baldy ”IMG781 – Butterfly Betsy”. You can find it by clicking the image title.


Butterfly Betsy reminds me of me, when I was younger laying in my parents’ garden on a summer afternoon and a butterfly came flying by, so I simply had to colour her. I decided to make her in bright colours opposed to the strong colours I usually love to use.


I used the following Copic markers for the project:

Skin: E11, E21, E00, E000, R20 and E04
Eyes: B29, B28 and B12
Hair: E44, E35 and E43
Dress: RV55 and RV63 Roses on dress: R22
Hat and flower on hat: E04 and R20
Bow on hat and legs: B00 and B000
Shoes: C5 and C3
Flowers: Y15 and YR14
Grass: YG17
Butterfly: YG63, G21, R20, B00, G00 and V01

The sky around her, I coloured with my with my Pergamano dorso colour blue and spread the colour with a cotton ball.

I made a frame from some flowery card stock I have and put it on card in teal, orange and red, which match the colours on the flowers on the card.

As embellishments on the card, I’ve used a swirl die, I have. I have 4 different size sun punches, which I’ve layered and used for the flowers. The smallest punch I used two of for the flower center, and I put a pearl on the center as well. Finally, I balanced the two flowers with two big yellow pearls on opposite corners.

I hope you like my card. Feel free to leave a message to let me know. Please join my blog if you would like to see my projects on a regular basis.

Be Happy Crafting! 

Monday 22 February 2016

Wet or dry embossing


Hi there!

Today the reminder challenge over at the Scrapbook Stamp Society challenge blog must be Anything Goes – Option : Embossing Wet or Dry.

For my card I used Sherri Ann Baldy “Winged one Cynthia”. You can find it by clicking the image title.

Since I don’t have many embossing folders for anything other than Christmas, and no embossing powder at all, I had to go with paper that was already embossed. Luckily I found some of that some time ago in the local supermarket and thought that would be fun to use here.

I’m not good at colouring wings, so I hope you’ll forgive that. I hope to be better one of these days, but I loved colouring the rest of her.


On her legs I tried to use the technique I earned when I coloured my Mindful Me projects and I think they turned out fine.


I used the following Copic markers for the project:

Skin: E11, E21, E00, E000, R20 and E04
Hair: W7, W5 and W3
Eyes: YG67, YG63 and YG03
Dress: YG11 and YG03 (layers)
Jewelry: BG59
Wings: UG11, Y00, BV000, BG000 and R20

There’s not that many colours in this image, and I’ve made it that way on purpose, because I’m experimenting with layering the same colour and see, what darker nuances comes out of it.

As embellishments on the card, I put 3 difference size teal coloured pearls on opposite corners.

Then I tried out a super idea I got from someone (sorry, I forgot the name) whose card I saw in a FB group.  I have a lot of big flowers that I have refrained from using because of their size. This person had used them as a sort of background for her other flower decoration. I had to make a go at it, and I think this turned out well. So now I’ve passed the idea on J. Enjoy experimenting, I certainly do.

I hope you like my card. Feel free to leave a message to let me know. Please join my blog if you would like to see my projects on a regular basis.

Be Happy Crafting!